
FluxCore is carefully designed to give users total control over their machines. Anticipating a notable participation from the crypto-native community joining the PoUW network, we found it logical to seamlessly integrate a comprehensive mining software module into the FluxCore client.
Why is this Integration Important?
Crypto miners possess substantial GPU power, spanning across both older and newer models, all of which can be harnessed to address real-world challenges. However, recognizing the profit-oriented nature of individuals, we understand that users may prefer actively mining cryptocurrency over idling on the PoUW network without job requests.
To enhance user experience, we’ve integrated mining capabilities directly into FluxCore, eliminating the need for users to manually switch between FluxCore and other popular mining software like HiveOs, Bitdeer, Minerstat, and others.
This integration ensures a seamless experience, allowing users to connect their machines to the PoUW network via FluxCore while simultaneously engaging in cryptocurrency mining. Looking forward, we aim to develop an automated system enabling users to mine crypto during idle periods on the PoUW network and automatically switch to incoming jobs when more profitable.
Enough for an Introduction. Let’s now delve into navigating and utilizing the Mining Module to guide you through your first initial miner configuration.
1. Ensure the Mining Module is installed; access to its Dashboard is only possible once the installation is complete. Click the Install Icon next to “Mining Module” on the menu bar to initiate the installation process. Once installed it will appear under AVAILABLE and you can access it

2. The Mining Overview
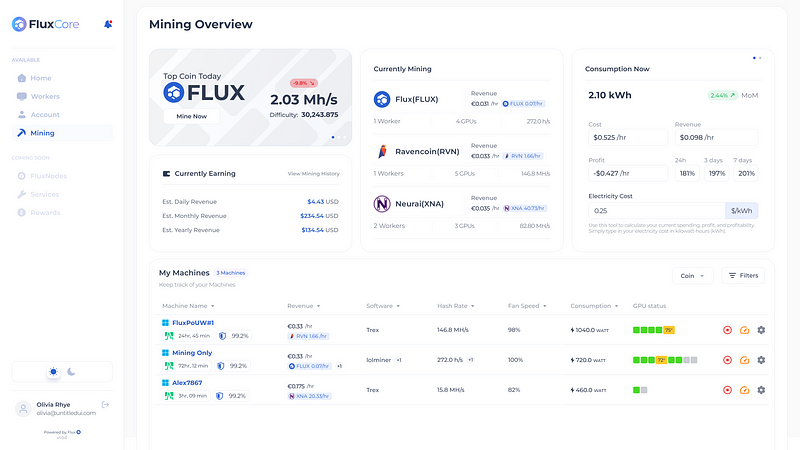
Let’s systematically explore the dashboard, examining each section in detail step by step.
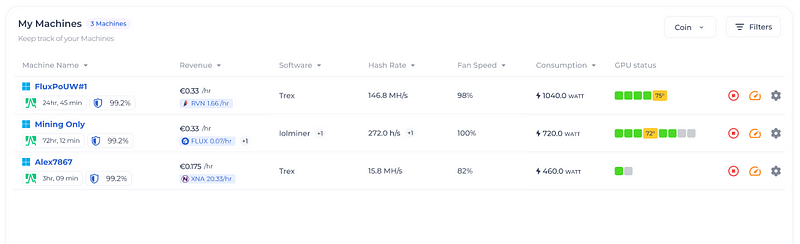
My Machines
This is accomprehensive overview of all machines associated with your FluxCore account, encompassing both local and imported machines. This summary includes vital details like Machine Name, Uptime, and Block Reliability. Additionally, you can effortlessly track the revenue generated by the currently mined coins in both $ and asset values. Gain instant insights into your machine’s mining setup with key metrics such as Mining Software, Hash Rate, Fan Speed, Power Consumption, and GPU Status. This will help you navigate and optimize your mining experience with precision.
Control

This column enables you to effortlessly stop/start a miner, edit its configurations, or adjust overclocking settings.
GPU Status
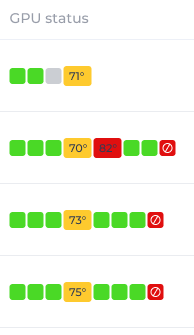
Each box in the display corresponds to a single GPU. A grey box indicates that the GPU is currently unassigned for mining, while a green box signifies an active mining status. If a GPU’s temperature reaches 70 degrees Celsius or higher, the box turns yellow, serving as a caution for potential overheating. Once a GPU’s temperature reaches 80 degrees or higher, a red box alerts, signaling the need to inspect the setup, including fans, overclocking settings, etc. Additionally, a red stop icon signals that the GPU is either broken or wrongly configured.
Utilize these color-coded indicators to promptly identify and address issues with your GPUs, ensuring an optimal mining experience.
Currently Earning
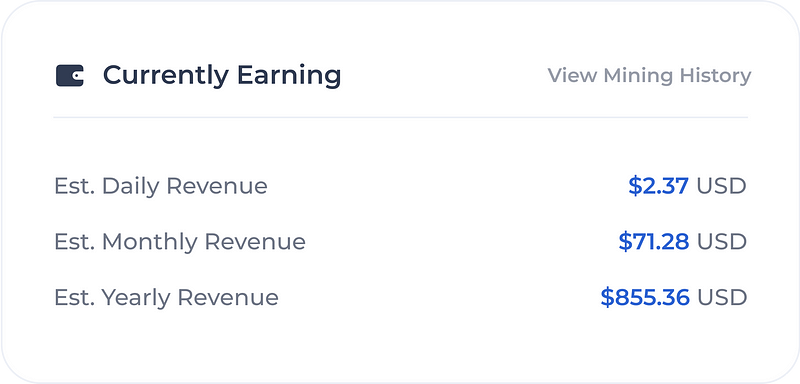
This tile offers a convenient snapshot of your current earnings from the mining operation, presenting estimated daily, monthly, and yearly revenue based on your current mining setup. For a more in-depth analysis, click on “View Mining History” to access the Mining History page under the “Account” section. Here, you can explore detailed information about your mining performance.
Currently Mining
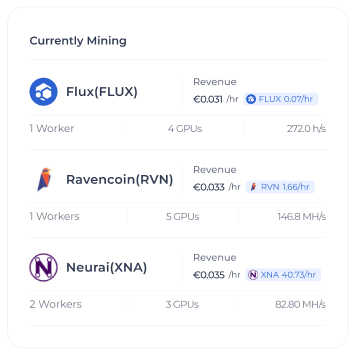
This tile provides insights into the cryptocurrencies currently being mined, detailing the number of workers, GPUs in operation, total hashrate, and the current hourly revenue in both dollar amount and asset form. It offers a comprehensive view of your mining activities, allowing you to track key metrics and assess your real-time earnings effortlessly.
Consumption Now
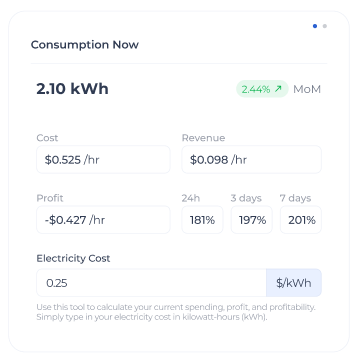
This tile functions as a compact integrated calculator, empowering you to determine your potential profit based on the current mining operation and your electricity cost. Simply input your electricity price in the designated box, and the tile will automatically update the values, allowing you to quickly assess your profitability in real-time.
3. Access a Machine to Configure Your Miner
Click either on the Machine Name or the Settings Icon on the right side to enter the machine settings and configure your miner.

You will see something remarkably similar to this:
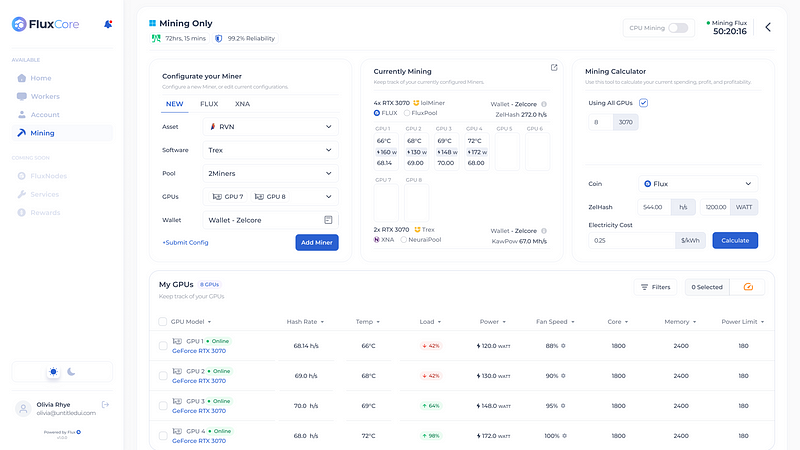
Let’s systematically explore the new dashboard, examining each section in detail step by step.
My GPUs
This tile enables you to monitor the total GPUs of the machine, providing information such as GPU model, hash rate, temperature, current load, power consumption, fan speed, core, memory, and power limit. By clicking the selection box to the left of the GPU model, you can easily overclock a single GPU or multiple GPUs at once.
Configurate your Miner
To configure a new miner, click on the “NEW” tab and navigate through the selection boxes to choose the asset, software, pool, GPUs, and wallet. After completing these steps, click “Add Miner” to save its configuration. A new tab labeled with your asset name (e.g., FLUX in this example) will appear at the top. Upon clicking “Add Miner,” you will automatically visit this tab.
Here, you’ll find something like the following layout, featuring a “Start Miner” button, and your saved configuration. Clicking this button initiates the mining process, and the timer begins. You’ll notice that the “Start Miner” button transforms into “Stop Miner.” To halt the mining process, simply click “Stop Miner.” If you wish to entirely delete this configuration, click the trash icon next to the button layouts.
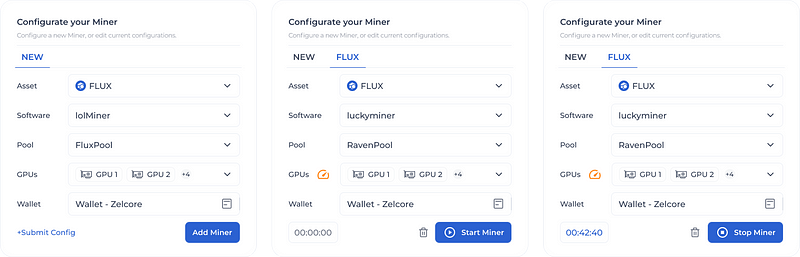
All saved configurations will be stored in tabs adjacent to the “NEW” tab. To edit, start, or stop mining configurations, click on the respective tabs to access their control panels.

Currently Mining
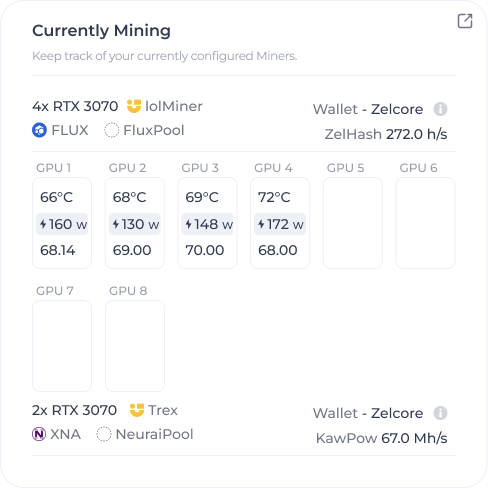
This tile provides an overview of your current mining setup for this machine. It includes details on the GPU types in use, the mined asset, the chosen mining pool, mining software, wallet destination, and the total hashrate.
Each GPU is represented by a box displaying its temperature, power consumption, and hash rate. A plain white box indicates an unused GPU. In the given example, the machine “Mining Only” has a total of 8 GPUs, with the first 4 mining FLUX, and GPUs 5–8 remaining idle. Another entry for XNA (Neurai) appears below, requiring scrolling for complete details.
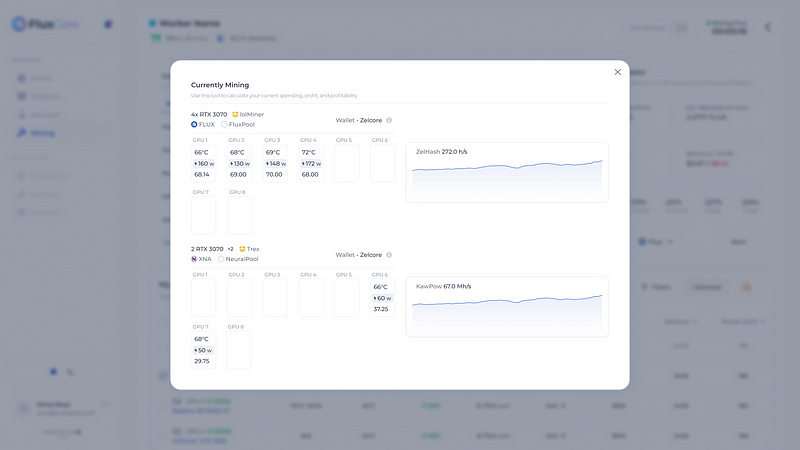
To streamline information access, click the pop-out icon in the top right of the tile. This opens a larger popup displaying all details without the need for scrolling. This feature proves especially useful when mining multiple assets on the same machine.
Mining calculator

This tile serves as a calculator to assess your current spending, profit, and profitability. It auto-populates all your GPU types, eliminating the need for manual input. To select the number of GPUs, simply type a number in the box, or use the “Select All” function. The tile will automatically provide outputs for total hashrate and power consumption based on the input value.
Now, input your electricity cost price and click the “Calculate” button. This action will transition the tile to a new one, presenting the calculator’s output information, including Estimated Rewards 24h, Exchange Rate and its exchange, Revenue and Profit 24h, and Profitability.
