
For users currently utilizing an existing platform to host their Firo Masternode and contemplating a transition to the Flux Cloud solution, they will need to undertake one of the following steps, depending on their familiarity with their OperatorKey
The updated deployment method for Firo Masternodes on Flux Cloud enables the concurrent operation of three Firo Masternodes through a singular deployment process. To achieve this, it is recommended generating three distinct Firo Masternode secrets for subsequent utilization.
OpertorKey is known
Step 1: Installing your Firo Masternode via the Flux Cloud Marketplace
- We first need to head over to https://home.runonflux.io/
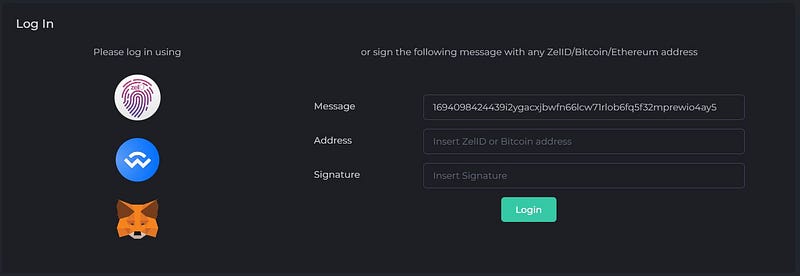
- Once here, we need to login using our ZelID. Available for us via Zelcore https://zelcore.io/ (Remember to use always the official links)
- Please authenticate by clicking on the fingerprint button or manually by signing the message manually on your Zelcore Wallet with the ZelID App
- Now that you have been authenticated, go to “Marketplace” on the left-hand menu. Once there look for the FiroMN application — You will find them under the ‘Masternode’ category, where various subscription models with different durations are available.

- Simply click on “Start Launching Marketplace App”
- Next, you will see a screen like this:

- You can click “Next” or copy the Registration Message if you want to sign the message manually using your ZelID App, and then click “Next.”
- Here, you can click the fingerprint button to sign the request for the application. If you have done this manually, paste the signed message from the earlier step onto your ZelID.


- You will now see the monthly cost for your application. Click on “Register Flux App.”


- You will be given payment information in FLUX. Payment is made through the FLUX blockchain using FLUX coins.

- You’re done! We now need to wait for your Masternode to be spawned on an available FluxNode, which usually takes around 10–30 minutes.
Step2: Finding our your IPs + Adding your Firo Masternode Private Key to your three Flux Cloud Servers
- When logged in via your ZelID you can head over to https://home.runonflux.io/apps/globalapps and to the “My Active Apps” Tab. Here you will be able to Manage and visit your new Masternode deployment that you have just done. Click on the arrow pointing down to see your application specifications and the IPs running it.
- You will need these IPs to set up your Masternode from the Firo Wallet side. Particularly on Step3: Masternode Registration


- Access each server individually by selecting “Visit FluxNode” for each.

- Once there, click on the desired option under “Log In” to sign in. We support ZelID, accessible through the Zelcore wallet, as well as MetaMask or any wallet that has WalletConnect support.

- Now that you have been authenticated, go to “Apps” and select “Local Apps” from the left-hand menu, then select “My Local Apps”
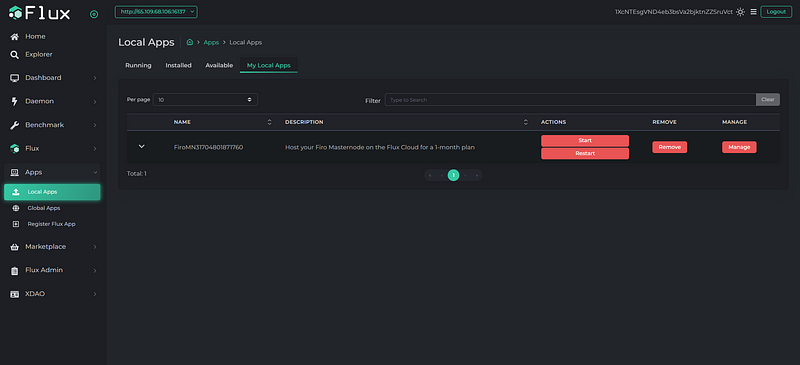
- Select “Manage” for your Frio Masternode application you wish to access. A pop-up will appear. Proceed by clicking on “Manage App.”
- Navigate to the “Execute Commands” section, where you will encounter the following user interface.
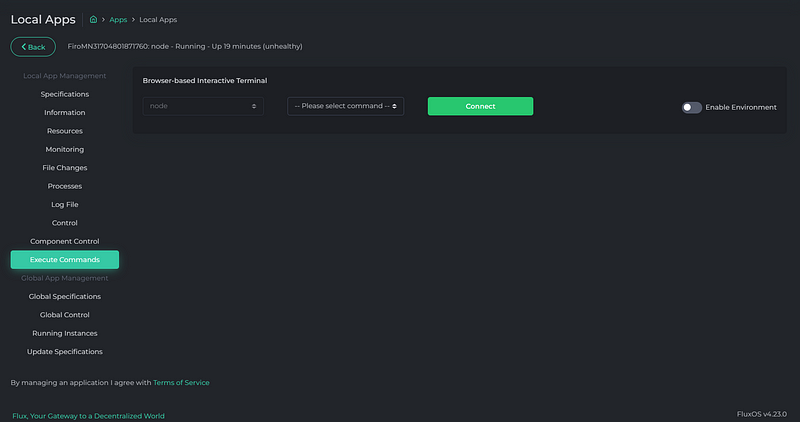
- Choose “/bin/bash” from the drop-down menu labeled “-Please select command-” and subsequently press the green “Connect” button.

- You now possess direct access to the server, allowing you to execute commands as needed.

- Execute the provided command to update your firo.conf file with the Masternode private key (Operator Key) which is known to you. If you are not aware of this key, please proceed to the section of the guide that explains the deployment process in case the Operator key is unknown.
- /key.sh <past secret>
- For Instance: /key.sh 09674b6dd7126813d21eb940f90c47fe06c93f25a585d055b07011d57b856974


- Verify the successful saving of the Masternode private key by executing the following command: cat /root/.firo/firo.conf

- Subsequently, initiate a restart of your application by navigating to the “Control” section in the left-hand menu, and selecting “Restart App” under the “Control” options.

- Upon the successful restart of your application, you should receive a notification at the top right. To confirm the persistence of your secret, double-check by clicking on “Execute Commands” again and utilizing the following command one more time: cat /root/.firo/firo.conf
- Congratulations! You have effectively configured one Flux Cloud server. You can now replicate the Step 5 procedure with the remaining two server IPs you own to concurrently operate three Firo Masternodes, each using distinct secrets.
Step3: Masternode Registration
The updating process must be done on your local Firo wallet, not on your Masternode Server on Flux Cloud
- You need to update your current masternode registration with the new IP that you got from Step2: Finding our your IPs + Adding your Firo Masternode Private Key to your three Flux Cloud Servers
- Log into your Firo Wallet, ensure you have the latest Firo wallet
- Go to Help > Debug Window > Console and type in
protx update_registrar proTxHash ipAndPort operatorKey operatorPayoutAddress feeSourceAddress
Details:
- proTxHash: the proTxHash of your masternode. In the Masternodes tab on your local wallet, right-click on the banned node and choose ‘Copy Protx hash’
- ipAndPort: One of your IP addresses from Step 5 and port 8168 of your masternode
- operatorKey: znodeblsprivkey of the masternode, which you still have access to
- operatorPayoutAddress: “” , if you set your operatorReward to 0 during registration
- feeSourceAddress: an address in the local wallet that has FIRO to fund the transaction. Can
- Updating was successful once the transaction containing your registration is mined and is included in a block. To check, copy the transaction ID and enter it here: explorer.firo.org
- Once the transaction is mined, the updated masternode you just registered should appear in the masternodes tab in the wallet.
- Ensure that you repeat this step for all three Firo Masternodes configured during Step 2.
Step 4: Check the Masternode Status on your Flux Cloud Server
Do not skip this step. To check your masternode’s status on the masternode itself, do the following:
- Visit https://home.runonflux.io/ and log in with your ZelID
- Navigate to “Apps”, “Global Apps”, “My Apps”
- Click the extension arrow on your Masternode deployment
- Visit your choosen Server IP by clicking on “Visit FluxNode”
- Log in with your ZelID
- Navigate to “Apps”, “Local Apps”, “My Local Apps”
- Click “Manage”, “Manage App”, “Log File”
If everything was setup correctly, you should see your masternode’s details along with these two lines at the bottom:

OperatorKey is Unknown
Step1: Generate a new OperatorKey, and update Registrar
- In Debug Console, enter bls generate. The output will be similar to this:
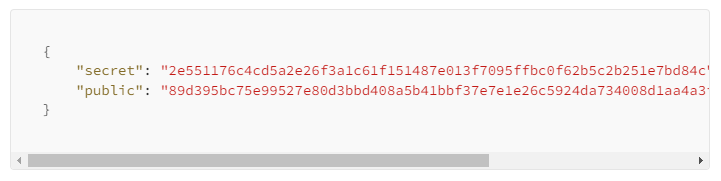
- secret: This is your operatorKey (for protx) and also the znodeblsprivkey for use in Step 3
- public: This is your operatorPubKey (for protx) below
- In Debug Console please enter:
protx update_registrar proTxHash operatorPubKey votingAddress PayoutAddress feeSourceAddress - operatorPubKey is the new one that is paired with the new operatorKey
Step2: Installing your Firo Masternode via the Flux Cloud Marketplace
- We first need to head over to https://home.runonflux.io/
- Once here, we need to login using our ZelID. Available for us via Zelcore https://zelcore.io/ (Remember to use always the official links)
- Please authenticate by clicking on the fingerprint button or manually by signing the message manually on your Zelcore Wallet with the ZelID App
- Now that you have been authenticated, go to “Marketplace” on the left-hand menu. Once there look for the FiroMN application — You will find them under the ‘Masternode’ category, where various subscription models with different durations are available.
- Simply click on “Start Launching Marketplace App”
- Next, you will see a screen like this:
- You can click “Next” or copy the Registration Message if you want to sign the message manually using your ZelID App, and then click “Next.”
- Here, you can click the fingerprint button to sign the request for the application. If you have done this manually, paste the signed message from the earlier step onto your ZelID.
- You will now see the monthly cost for your application. Click on “Register Flux App.”
- You will be given payment information in FLUX. Payment is made through the FLUX blockchain using FLUX coins.
- You’re done! We now need to wait for your Masternode to be spawned on an available FluxNode, which usually takes around 10–30 minutes.
Step3: Finding our your IPs + Adding your Firo Masternode Private Key to your three Flux Cloud Servers
- When logged in via your ZelID you can head over to https://home.runonflux.io/apps/globalapps and to the “My Active Apps” Tab. Here you will be able to Manage and visit your new Masternode deployment that you have just done. Click on the arrow pointing down to see your application specifications and the IPs running it.
- You will need these IPs to set up your Masternode from the Firo Wallet side. Particularly on Step3: Masternode Registration
- Access each server individually by selecting “Visit FluxNode” for each.
- Once there, click on the desired option under “Log In” to sign in. We support ZelID, accessible through the Zelcore wallet, as well as MetaMask or any wallet that has WalletConnect support.
- Now that you have been authenticated, go to “Apps” and select “Local Apps” from the left-hand menu, then select “My Local Apps”
- Select “Manage” for your Frio Masternode application you wish to access. A pop-up will appear. Proceed by clicking on “Manage App.”
- Navigate to the “Execute Commands” section, where you will encounter the following user interface.
- Choose “/bin/bash” from the drop-down menu labeled “-Please select command-” and subsequently press the green “Connect” button.
- You now possess direct access to the server, allowing you to execute commands as needed.
- Execute the provided command to update your firo.conf file with the Masternode private key (Operator Key) which you generated during Step1: Generate a new OperatorKey, and update Registrar
- /key.sh <past secret>
- For Instance: /key.sh 09674b6dd7126813d21eb940f90c47fe06c93f25a585d055b07011d57b856974
- Verify the successful saving of the Masternode private key by executing the following command: cat /root/.firo/firo.conf
- Subsequently, initiate a restart of your application by navigating to the “Control” section in the left-hand menu, and selecting “Restart App” under the “Control” options.
- Upon the successful restart of your application, you should receive a notification at the top right. To confirm the persistence of your secret, double-check by clicking on “Execute Commands” again and utilizing the following command one more time: cat /root/.firo/firo.conf
- Congratulations! You have effectively configured one Flux Cloud server. You can now replicate the Step 3 procedure with the remaining two server IPs you own to concurrently operate three Firo Masternodes, each using distinct secrets.
Step4: Masternode Registration
- You need to update your current masternode registration with the new IP that you got from Step3: Finding our your IPs + Adding your Firo Masternode Private Key to your three Flux Cloud Servers
- In Debug Console please enter:
protx update_service proTxHash ipAndPort operatorKey operatorPayoutAddress feeSourceAddress
Details:
- proTxHash: the proTxHash of your masternode. In the Masternodes tab on your local wallet, right-click on the banned node and choose ‘Copy Protx hash’
- ipAndPort: One of your IP addresses from Step 3 and port 8168 of your masternode
- operatorKey: the secret from Step 1
- operatorPayoutAddress: “” , if you set your operatorReward to 0 during registration
- feeSourceAddress: an address in the local wallet that has FIRO to fund the transaction. Can be
- Updating was successful once the transaction containing your registration is mined and is included in a block. To check, copy the transaction ID and enter it here: explorer.firo.org
- Once the transaction is mined, the updated masternode you just registered should appear in the masternodes tab in the wallet.
- Ensure that you repeat this step for all three Firo Masternodes configured during Step 3.
Step 5: Check the Masternode Status on your Flux Cloud Server
Do not skip this step. To check your masternode’s status on the masternode itself, do the following:
- Visit https://home.runonflux.io/ and log in with your ZelID
- Navigate to “Apps”, “Global Apps”, “My Apps”
- Click the extension arrow on your Masternode deployment
- Visit your choosen Server IP by clicking on “Visit FluxNode”
- Log in with your ZelID
- Navigate to “Apps”, “Local Apps”, “My Local Apps”
- Click “Manage”, “Manage App”, “Log File”
If everything was setup correctly, you should see your masternode’s details along with these two lines at the bottom:
Additional Useful Tips
Unbanning your masternode
The ubanning process must be done on your local wallet, not on your Flux Cloud server
- Your masternode is banned if it has the POSE_BANNED status. You can unban your masternode by entering this command in your local wallet’s Debug Console:
protx update_service proTxHash ipAndPort operatorKey operatorPayoutAddress feeSourceAddress
Details:
- proTxHash: the proTxHash of your masternode. In the Masternodes tab on your local wallet, right-click on the banned node and choose ‘Copy Protx hash’
- ipAndPort: ipAndPort of banned masternode
- operatorKey: znodeblsprivkey of the masternode, usually inside firo.conf on the masternode. This is different than the operatorPubKey!
- operatorPayoutAddress: “” , if you set your operatorReward to 0 during registration
- feeSourceAddress: an address in the local wallet that has FIRO to fund the transaction. Can be obtained with the listaddressbalances command
- Please ensure that you have fixed the problem that caused the ban before unbanning your masternode otherwise it will get banned again. A more detailed guide is here.
- After unbanning, ensure that you check the status of the masternode in both the wallet and the masternode itself.
Renewing your Flux Cloud Subscription
- Remember, your Firo Masternode is only subscribed for your chosen plan initially. You will need to renew payment before the plan ends, so it does not get kicked off the network. We give you the choice to renew it for a longer terms after the first deployment for up to one whole year. Please do the following:
- Visit https://home.runonflux.io/ and log in with your ZelID
- Navigate to “Apps”, “Global Apps”, “My Apps”
- Click “Manage”, “Manage App”, “Update Specifications”
- Leave all the variables like they are, except the PERIOD field — Adjust it to your preference. Next click on “Compute Update Message”
- Sign the Message with the ZelID App and click “Update Flux App” after
- Click “Pay with Zelcore” to make the Flux Payment
- Voilà your Node has been renewed for your chosen duration
Have Fun supporting Firo with decentralized Masternodes!
Learn more about Flux at www.runonflux.io
Learn more about Firo at https://firo.org/