
DISCLAIMER:
The upcoming Streamr 1.0 Nodes will leverage the enterprise application feature on Flux Cloud to secure sensitive information such as private keys and contract addresses. Retrieving these secrets through APIs is not possible, as the application exclusively deploys on enterprise nodes, specifically Titan Nodes and FluxNodes operating under a NDA.
TO ENHANCE SECURITY MEASURES, IT IS ADVISABLE TO ALLOCATE ONLY LIMITED AMOUNTS OF MATIC GAS TO YOUR NODES’ WALLETS. ADDITIONALLY, ENSURE THAT THE NODE’S ADDRESS PRIVATE KEY REMAINS EXCLUSIVE TO SERVING THE SOLE PURPOSE OF RUNNING A STREAMR NODE.
Step 1: Deploy your Operator Contract
- In the Streamr Hub, connect your wallet (top-right corner), navigate to Network -> Operators, then click “Become an Operator” and complete the dialog. The Operator contract is deployed on the Polygon blockchain.
- The wallet/account that you use to make the Operator creation transaction will be known as the Owner wallet. It’s the wallet you’ll use to control your Operator business. The owner wallet controls the Operator and is able to stake and unstake on Sponsorships, update the Operator settings, and withdraw the owner’s share of the Operator’s stake and earnings. This should be a very secure wallet as it controls the whole Operator. A hardware wallet (Ledger, etc) is recommended, although a software wallet (Metamask) will work too — just be sure to keep the account private and never share your private key or seed phrase with anyone.
- You’ll need to decide on your owner’s cut at the time of your Operator deployment. You’ll be able to change this value later on, as long as you unstake from all Sponsorships first.
Step2: Set up your Node Wallet Private Key
- Your node wallet, which consists of an Ethereum private key and address. You can use any method, such as create a new account in Metamask and export the private key, or use vanity-eth.
- DO NOT STORE YOUR DATA TOKENS ON THIS PRIVATE KEY ADDRESS. IT ONLY SHALL HOLD SOME LIMITED AMOUNT OF MATIC FOR GAS. PLEASE SEE STEP4: FUND YOUR NODES
- Note that private key down somewhere like a notepad, you will need it during Step6: Updating your current Streamr Broker Node deployment to the new Streamr 1.0 Testnet Node
Step 3: Pair your node with your Operator contract
To pair your node(s) with your Operator contract, you must make them aware about each other. For this, you need two things:
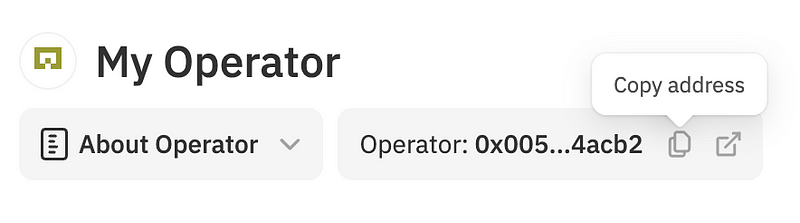
- Your Operator address (found near the top of your Operator page in the Streamr Hub).
- Note your Operator address down somewhere like a notepad, you will need it during Step6: Updating your current Streamr Broker Node deployment to the new Streamr 1.0 Testnet Node
- Your node wallet, which consists of an Ethereum private key and address. You might already have created one with the config wizard when setting up the node. Alternatively, you can use any method, such as create a new account in Metamask and export the private key, or use vanity-eth.
Add your Operator’s node addresses
- First, scroll down on your Operator page and find the “Operator’s node addresses” section. Click the “Add node address” button, paste in the address of your node wallet (not its private key!), click the button in the dialog and then don’t forget to click the Save button.

Step 4: Fund your nodes
- You’ll need a bit of
MATIC(the gas token of Polygon) in your node’s wallets as Streamr nodes that participate in sponsored streams will periodically make transactions. 1 to 5MATICis recommended since the nodes will be making a few transactions per day. If the node runs out of gas while they’re a part of an active Sponsorship, then a penalty may be applied to your unclaimed earnings. See Operator value maintenance.
DISCLAIMER:
The upcoming Streamr 1.0 Nodes will leverage the enterprise application feature on Flux Cloud to secure sensitive information such as private keys and contract addresses. Retrieving these secrets through APIs is not possible, as the application exclusively deploys on enterprise nodes, specifically Titan Nodes and FluxNodes operating under a NDA.
TO ENHANCE SECURITY MEASURES, IT IS ADVISABLE TO ALLOCATE ONLY LIMITED AMOUNTS OF MATIC GAS TO YOUR NODES’ WALLETS. ADDITIONALLY, ENSURE THAT THE NODE’S ADDRESS PRIVATE KEY REMAINS EXCLUSIVE TO SERVING THE SOLE PURPOSE OF RUNNING A STREAMR NODE.
Step 5: Fund your Operator
- Now, on your Operator page in the Streamr Hub UI, fund your Operator with DATA tokens. There’s no minimum amount, but note that the more tokens you fund your Operator with, the more you can accept delegations. The owner (you) must have at least a 5% stake in the Operator.
Step 6: Updating your current Streamr Broker Node deployment to the new Streamr 1.0 Testnet Node
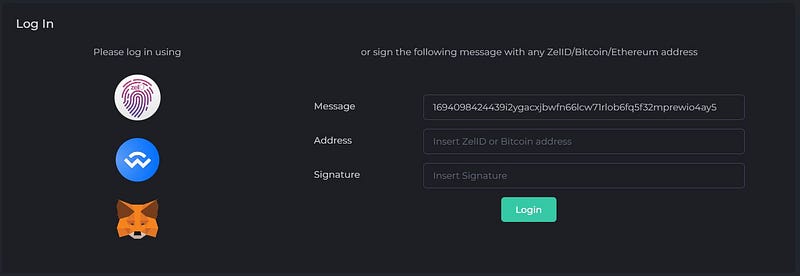
- We first need to head over to https://home.runonflux.io/
- Once there, click on the desired option under “Log In” to sign in. We support ZelID, accessible through the Zelcore wallet, as well as MetaMask or any wallet that has WalletConnect support.
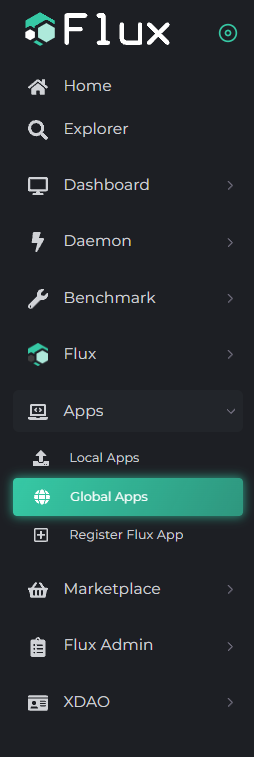
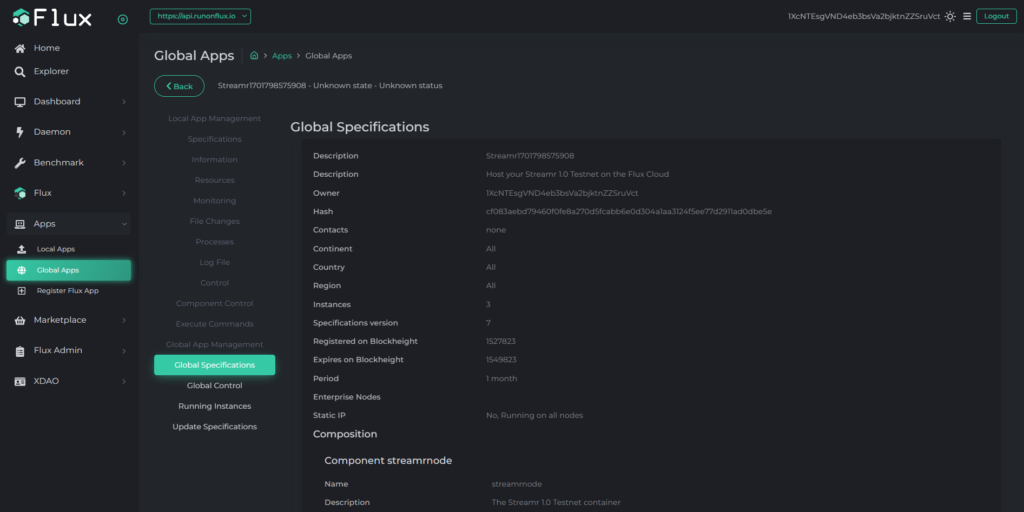
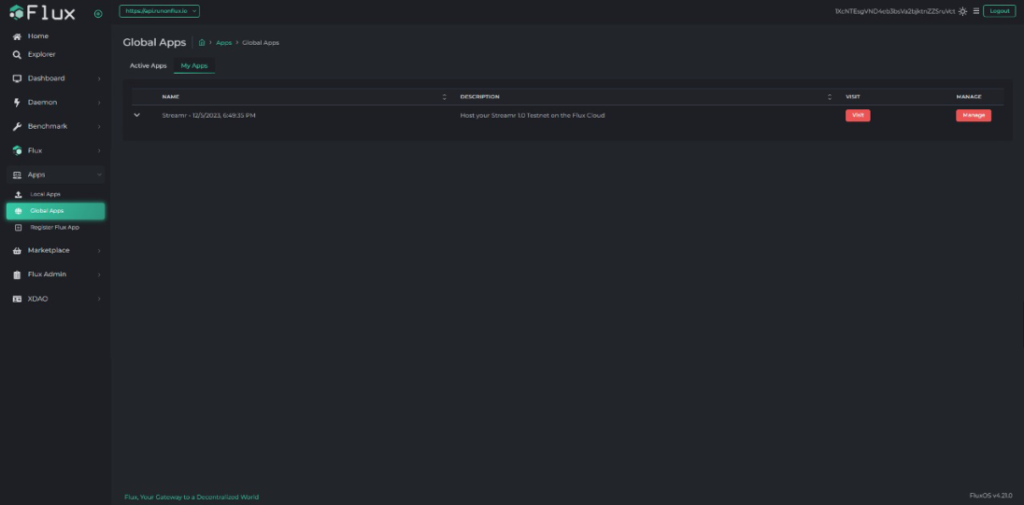
- Now that you have been authenticated, go to “Apps” and select “Global Apps” from the left-hand menu.
- You will see something similar to this:

- Please go to the “My Apps” tab to view only the applications that you have deployed.

- Select “Manage” for your Streamr Broker Node application you wish to access. A pop-up will appear. Proceed by clicking on “Manage App.”
- Go to “Update Specifications,” where you’ll encounter the familiar Flux Cloud UI used during the initial deployment.
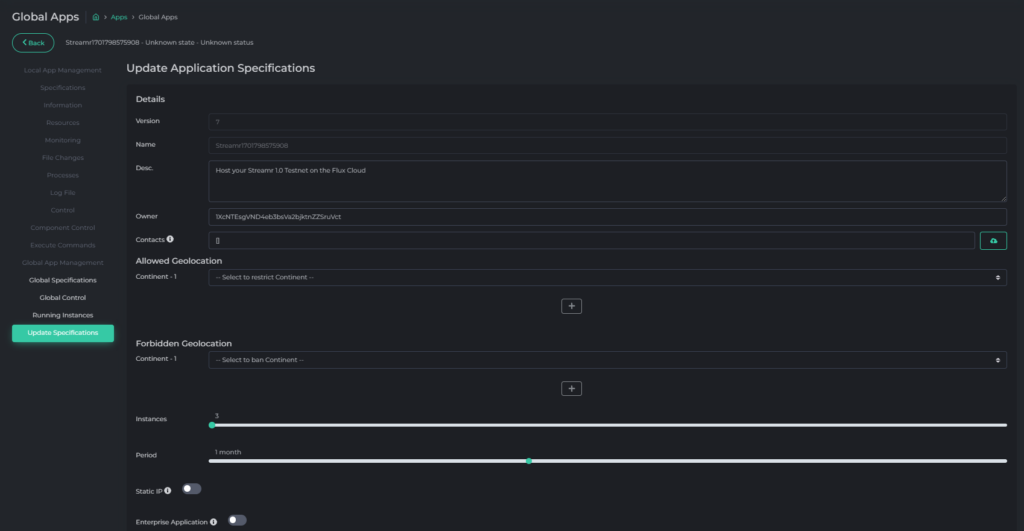
- Feel free to adjust the deployment Period if needed
- Toggle On the Enterprise Application Toggle

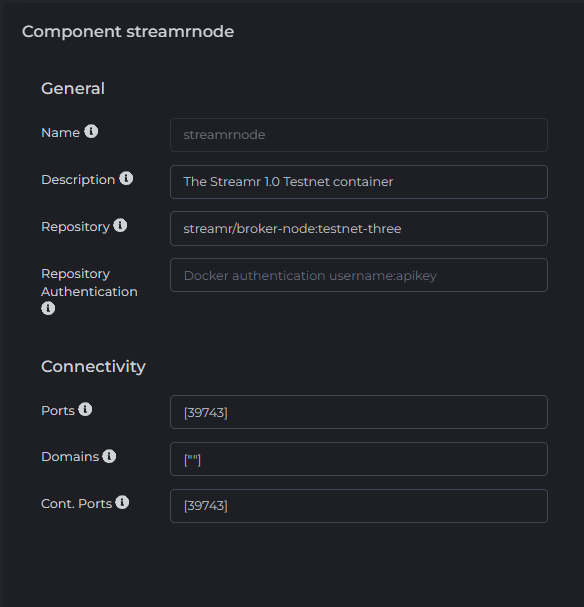
- Scroll down to Component.

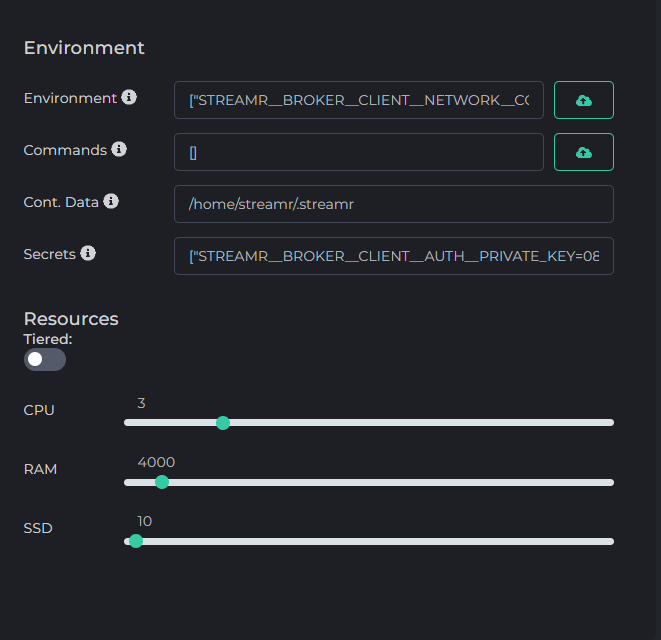
- Please update the following:
- Name [OPTIONAL]: Specify the name for your Docker container. Ensure there are no spaces or symbols in the name.
- Description [OPTIONAL]: Provide a description for your Docker container.
- Repository [MANDATORY]: streamr/node:latest
- Ports [MANDATORY]: Update to to a random port number between 30000 and 40000 enclosed in brackets, example [39743]
– there are some that are restricted. The banned ports include: ‘16100–16299’, ‘26100–26299’, ‘30000–30099’, 8384, 27017, 22, 23, 25, 3389, 5900, 5800, 161, 512, 513, 5901, 3388, 4444, 123 - Domains [MANDATORY]: Update domains to double quotations enclosed in brackets — [“”].
- Container Ports [MANDATORY]: Update to the same Port as you have chosen above and put it in brackets, in this example also [39743]
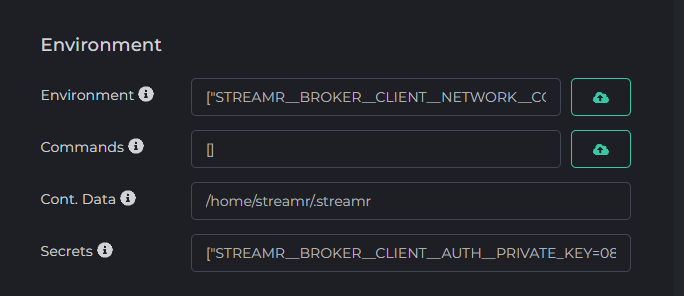
- Environment Parameters [MANDATORY]: Update to [“STREAMR__BROKER__CLIENT__NETWORK__CONTROL_LAYER__WEBSOCKET_PORT_RANGE__MIN=xxxx”,”STREAMR__BROKER__CLIENT__NETWORK__CONTROL_LAYER__WEBSOCKET_PORT_RANGE__MAX=xxxx”]
where xxxx is the Port that you have chosen above, in our example 39743, so:
[“STREAMR__BROKER__CLIENT__NETWORK__CONTROL_LAYER__WEBSOCKET_PORT_RANGE__MIN=39743″,”STREAMR__BROKER__CLIENT__NETWORK__CONTROL_LAYER__WEBSOCKET_PORT_RANGE__MAX=39743”]

- Commands [MANDATORY]: Maintain empty brackets — [].
- Container Data [MANDATORY]: Update to /tmp
- Secrets: Please stay focused and follow the instructions carefully!
Enter the Node Private Key, and Operator Address from steps 2 and 3 into their respective ENVs, enclosed in double quotations, and collectively surrounded by brackets:
– Node Private Key = STREAMR__BROKER__CLIENT__AUTH__PRIVATE_KEY
Operator Address = STREAMR__BROKER__PLUGINS__OPERATOR__OPERATOR_CONTRACT_ADDRESS
Example
[“STREAMR__BROKER__CLIENT__AUTH__PRIVATE_KEY=0868498f85e2c82a035810aab4ab3d737ed725a420b9337e03a317573932c71b”, “STREAMR__BROKER__PLUGINS__OPERATOR__OPERATOR_CONTRACT_ADDRESS=0x78137665dbf02ee5d1d1ab4addaaf4c3627323b2”]
The values here are just examples, please put into your own private key and operator address. Also in case you copy paste this example into home.runonflux.io and adjust the values, make sure that it copy pasted the right quotations with it. If not it can result in a JSON error message, if that happens please delete the quotations and typ them yourselves via your keyboard!
- Resources (Do not toggle on Tiered) [MANDATORY]: Update your Resources to the following — 3.0 Cores, 4.0 GB RAM, 10 GB SSD
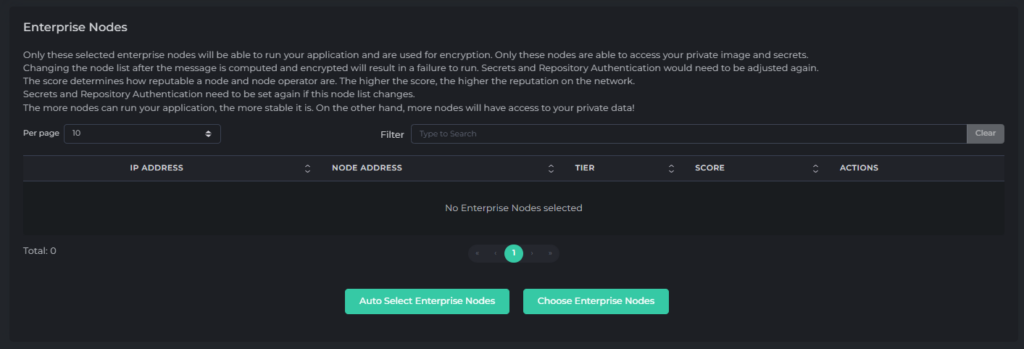
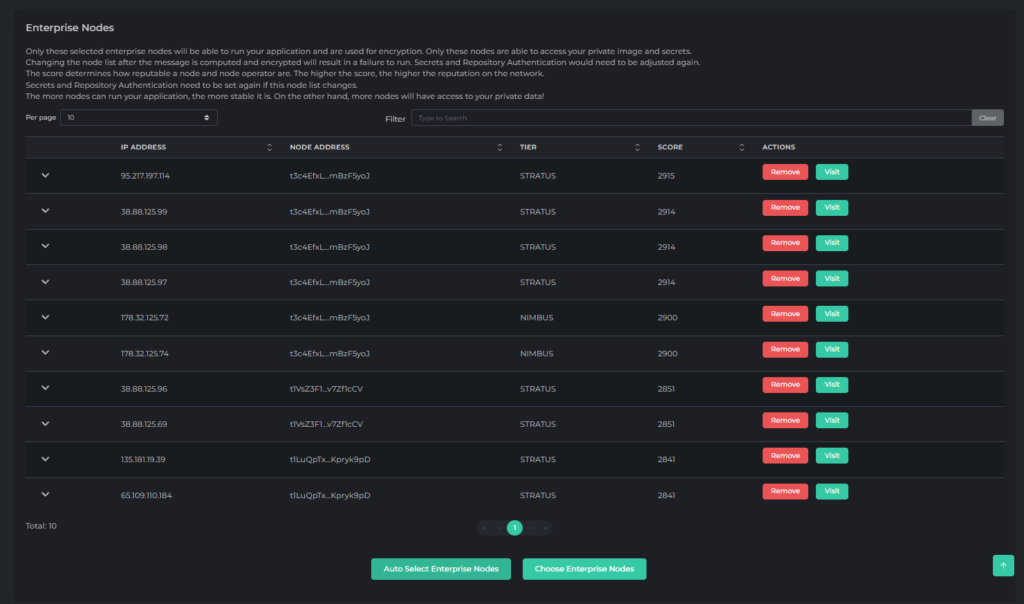
- Scroll down to the “Enterprise Node” section and click on “Auto Select Enterprise Nodes”
- After updating all the desired specifications, let’s proceed to the final two steps to successfully register your application.

- Agree to the Terms of Service by toggling the switch.
- Click “Compute Update Message.” You will see something similar to this.
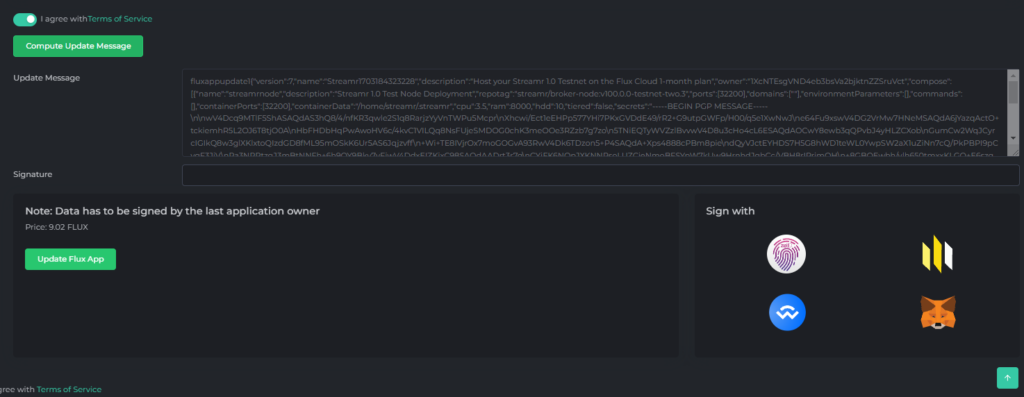
- Click on the desired option under “Sign with” to sign the registration message. We support ZelID, accessible through the Zelcore wallet, as well as MetaMask or any wallet that has WalletConnect support.

- Now you can update the application. The update price will show to you on the left side. Click “Register Flux App.” Once the message is propagated across the Flux network, a “Pay with Zelcore” fingerprint will appear. Click on it to make the Flux payment. Alternatively, you can do so manually by using the go-to address, along with the memo message shown at the bottom left.

- Congratulations! Your task is complete. Please wait for the Flux Watchtower to update your application, which may take up to 1 hour. If you wish to expedite the process, initiate a redeployment of your Docker container. Instructions for doing so can be found in the “The Flux Cloud Watchtower” article under the “Flux Cloud” category on our help.runonflux.io website.
Step7: Finding out your IP address of your Streamr 1.0 Testnet Node
- When logged in via your Zel ID you can head over to https://home.runonflux.io/apps/globalapps and to the “My Apps” Tab. Here you will be able to Manage and visit your new Streamr Node deployment that you have just done. Click on the arrow pointing down to see your application specifications and the IPs running it.

You can check the logs of the individual IPs to ensure that the Node is working properly.
- Visit one IP by clicking on “Visit FluxNode”
- Log in with your Zel ID
- Navigate to “Apps”, “Local Apps”, “My Local Apps”
- Click “Manage”, “Manage App”, “Log File”
You should see something similar like this (The Node is syncing):
Step 8: Check your Operator status
- All the checkmarks in the Operator status section on your Operator page should now be green, and you’re ready to join Sponsorships!

Step 7: Join sponsorships
- In the Hub, go to Network -> Sponsorships and find a Sponsorship you want your Operator to start working on. Click the “Join as Operator” button and select your stake. Note there is a minimum stake of 5000
DATAtokens for each Sponsorship that you join. Joining Sponsorships locks your tokens for a period of time, defined in the Sponsorship contract. - IMPORTANT: There’s a known connectivity issue using Brave browser. Your node connectivity status may report incorrectly on the Streamr Hub.
Renewing your Flux Cloud Subscription
- Remember, your Streamr Node is only subscribed for 22,000 Flux blocks initially, which is ~ 44,000 minutes (about 1 month). You will need to renew payment after the first month, so itdoes not get kicked off the network. We give you the choice to renew it for a longer terms after the first deployment for up to one whole year. Please do the following:
- Visit https://home.runonflux.io/ and log in with your Zel ID
- Navigate to “Apps”, “Global Apps”, “My Apps”
- Click “Manage”, “Manage App”, “Update Specifications”
- Leave all the variables like they are, except the PERIOD field — Adjust it to your preference. Next click on “Compute Update Message”
- Sign the Message with the Zel ID App and click “Update Flux App” after
- Click “Pay with Zelcore” to make the Flux Payment
- Voilà your Node has been renewed for your chosen duration
Streamr 1.0 Testnode Management for Patches
- Throughout the testnet, the Streamr Foundation will regularly release new Docker Hub Images to address bugs and issues identified by testers. Stay informed about these updates by monitoring their Discord channel for announcements.
- To keep your deployment up to date with the latest changes, you’ll need to manually edit your current configuration. This involves updating your Docker Hub repository with the newly released version and, if necessary, performing a hard redeploy promptly.
- For detailed instructions on editing your setup, refer to the following article: https://help.runonflux.io/docs/how-to-update-your-application-specifications-after-deployment/
Have Fun supporting Streamr with decentralized Infrastructure!
Learn more about Flux at www.runonflux.io
Learn more about Streamr at https://streamr.network/