Deploying your SimpleX servers on Flux offers flexibility and control over your setup. Whether you’re looking to run public or private servers for private chat, choose between clearnet or Tor configurations, or even a combination of both, this guide will walk you through one specific scenario: Deploying SimpleX SMP over both Clearnet and Tor.
By the end of this guide, you’ll have your SimpleX server online and accessible via both Clearnet and Tor. Let’s dive in!
Why Run SimpleX on Flux?
Flux provides a decentralized infrastructure where you control how your server operates, what network it resolves over, and how you manage payments. Running on Flux allows you to:
- Run public or private SimpleX SMP servers with or without passwords.
- Run public SimpleX XFTP servers with 40GB quota.
- Choose between clearnet, Tor, or both for server access.
- Experiment with advanced networking setups, like clearnet servers that can communicate with Onion addresses.
In this guide, we’ll focus on deploying SimpleX SMP over both Clearnet and Tor.
Getting Started: What You’ll Need
Before we start, ensure you have the following:
- Flux in your Zelcore or SSP Wallet for payments (or choose fiat payments if you prefer).
- A Flux account and access to the RunOnFlux dashboard.
Don’t have a wallet? Download Zelcore or SSP Wallet before proceeding.
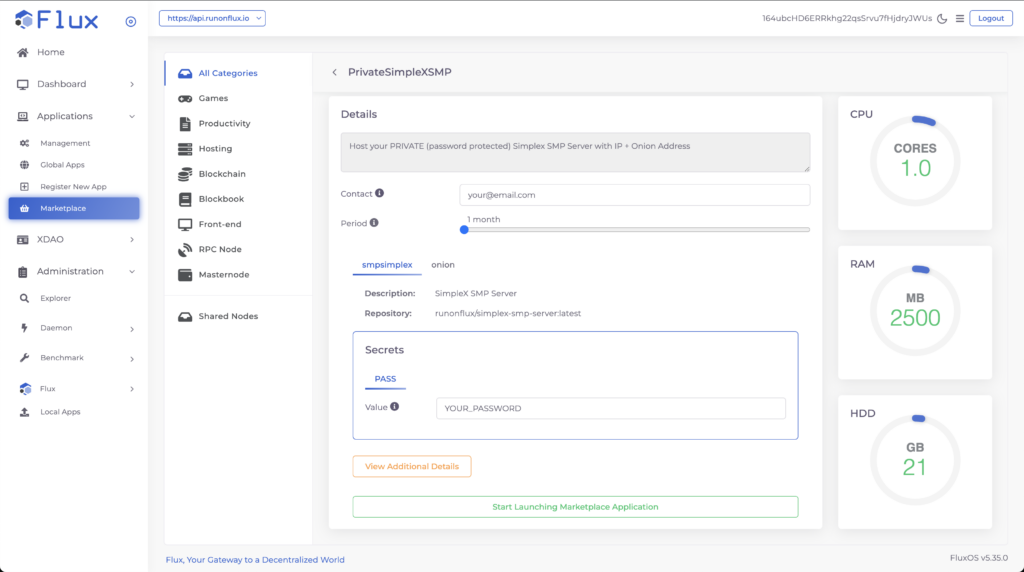
Step 1: Deploy SimpleX SMP to Flux Marketplace
- Login to Flux Dashboard
Head over to RunOnFlux and log in using your preferred method (crypto wallets or SSO options). - Navigate to the Marketplace
Visit the Flux Marketplace and search for “SimpleX.” - Choose Your Deployment Type
Select either:- Public SMP (no password required)
- Private SMP (password protected)
- Public XFTP
- Launch the Deployment
Your deployment with the guided set up. It will take around 10 minutes to be ready.
Step 2: Access Your Flux SimpleX Deployment
- Open the Flux Dashboard
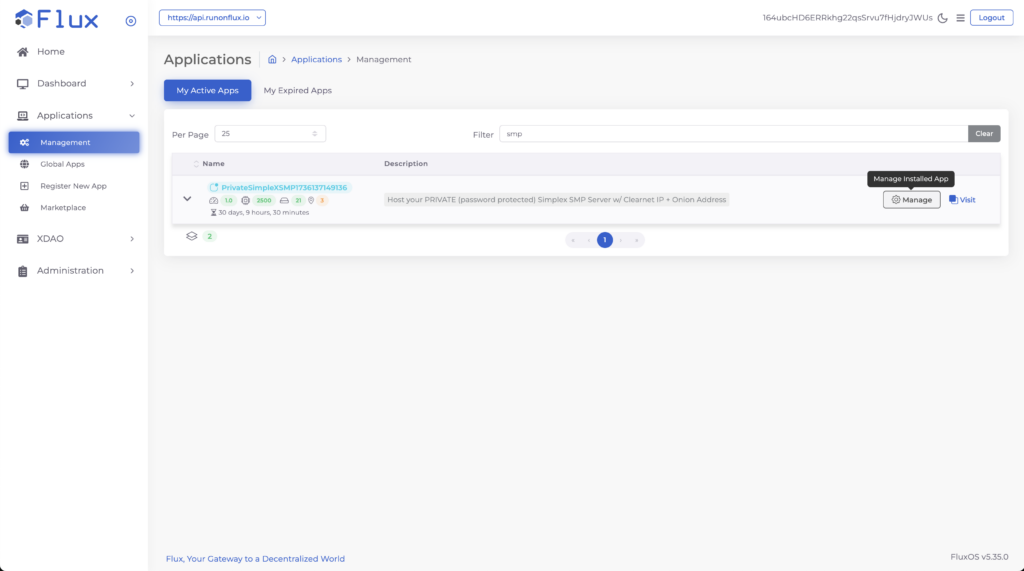
Once your server is deployed, tap on “Applications” from the side menu, then select “Management”. - Find Your Deployment
Locate your SimpleX server under “My Active Apps”. Tap the “Manage” button next to the server. - Manage Your App
Confirm your choice by clicking the “Manage App” button. You now have access to your live deployment!
Step 3: Get Your SimpleX Server and Onion Address
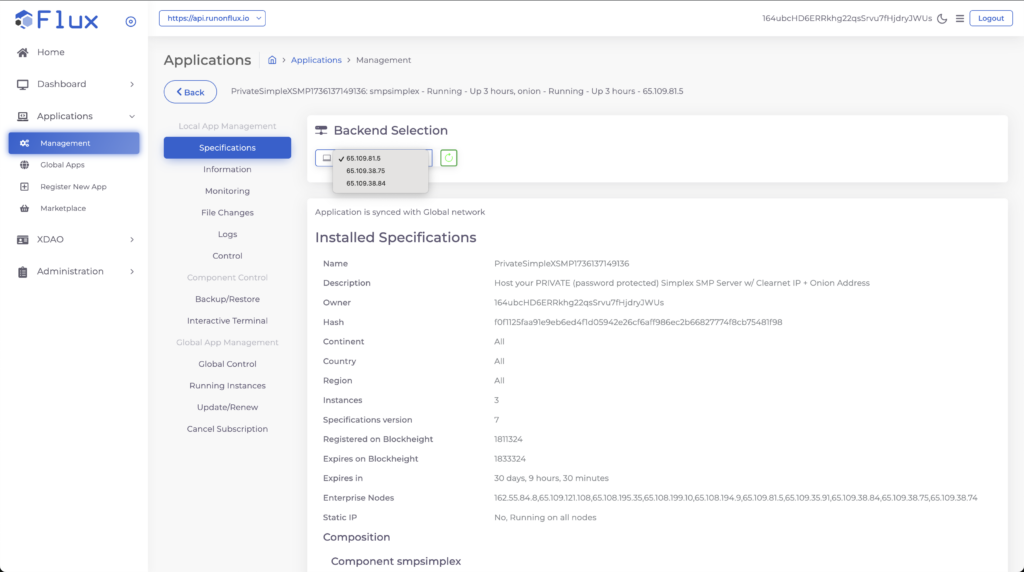
- 3 instances are running!
You now have 3 server instances running, you can use any one of them or even all of them independently! Toggle between them in the Backend Selection
- Check the Log Output
In the side menu, tap “Log File”. From here, you’ll see two important pieces of information:- Server Address: The address for your server.
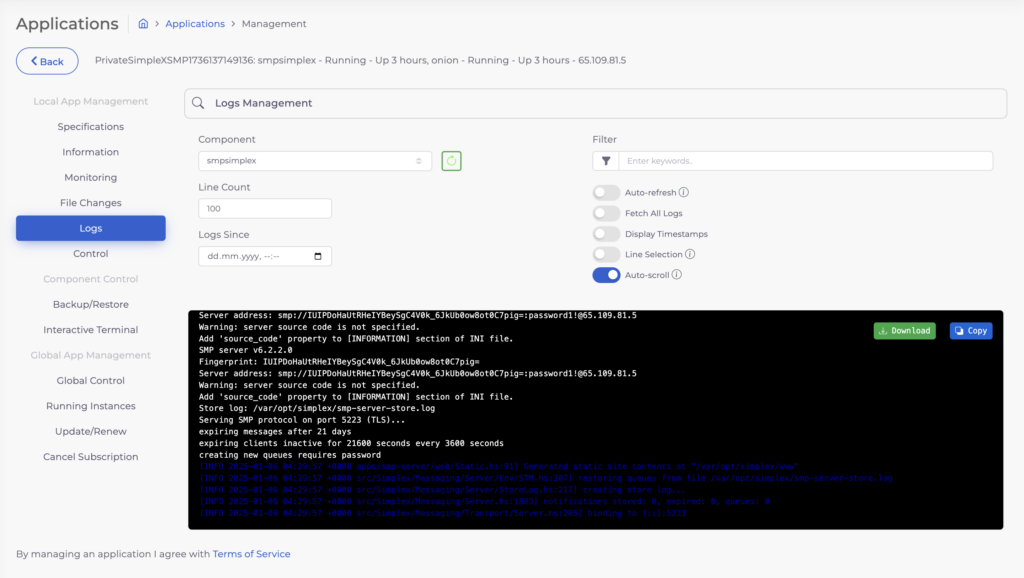
- Onion Address: The hidden service address that only resolves via Tor.
- Switch the component from the menu from smpsimplex to onion
- Onion is a bit experimental, let us know your experience with it!
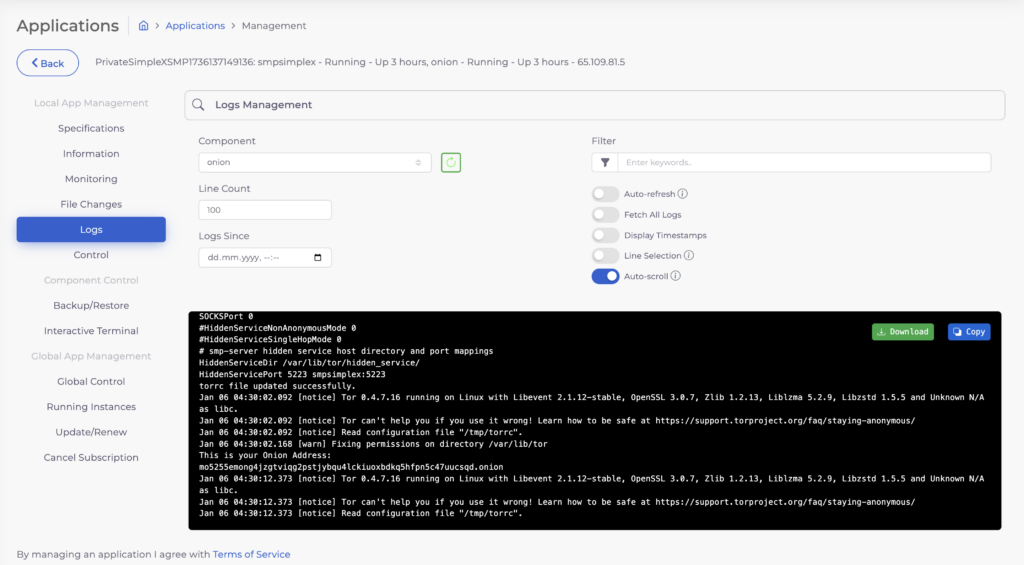
If you wish to use only IP address, focus on the smpsimplex component log and Server Address line:
Eg: smp://IUIPDoHaUtRHeIYBeySgC4V0k_6JkUb0ow8ot0C7pig=:[email protected]
You can now use this address directly in your SimpleX app. If you want to add Onion resolving, add comma and the onion address:
Eg: smp://IUIPDoHaUtRHeIYBeySgC4V0k_6JkUb0ow8ot0C7pig=:[email protected],mo5255emong4jzgtviqg2pstjybqu4lckiuoxbdkq5hfpn5c47uucsqd.onion
SMP uses default port 5223
XFTP Setup
Setting up XFTP is similar as SMP, XFTP Onion resolving is currently not supported by FluxOS. For XFTP we use custom port 34443.
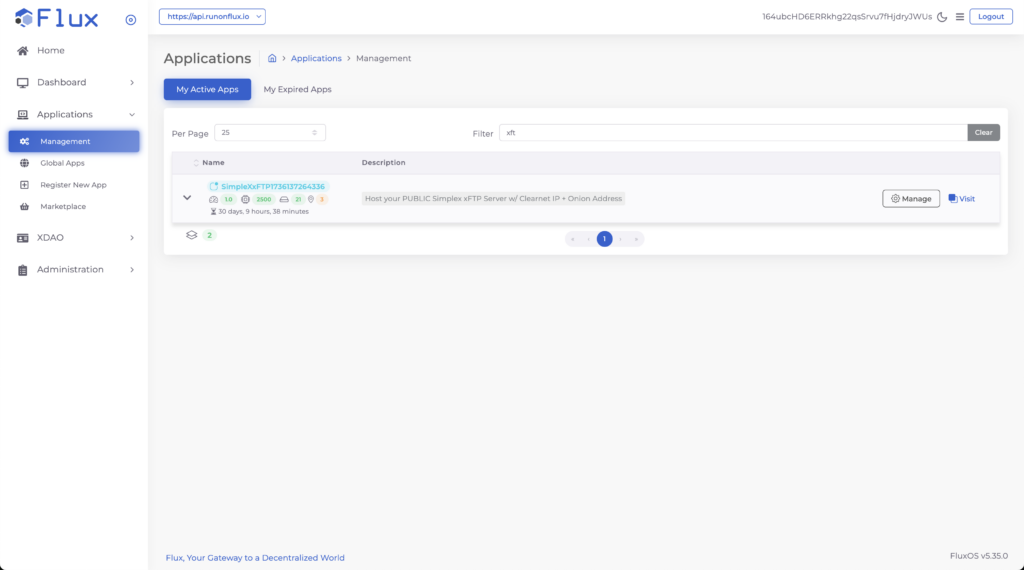
In management Copy the Server address including the port!
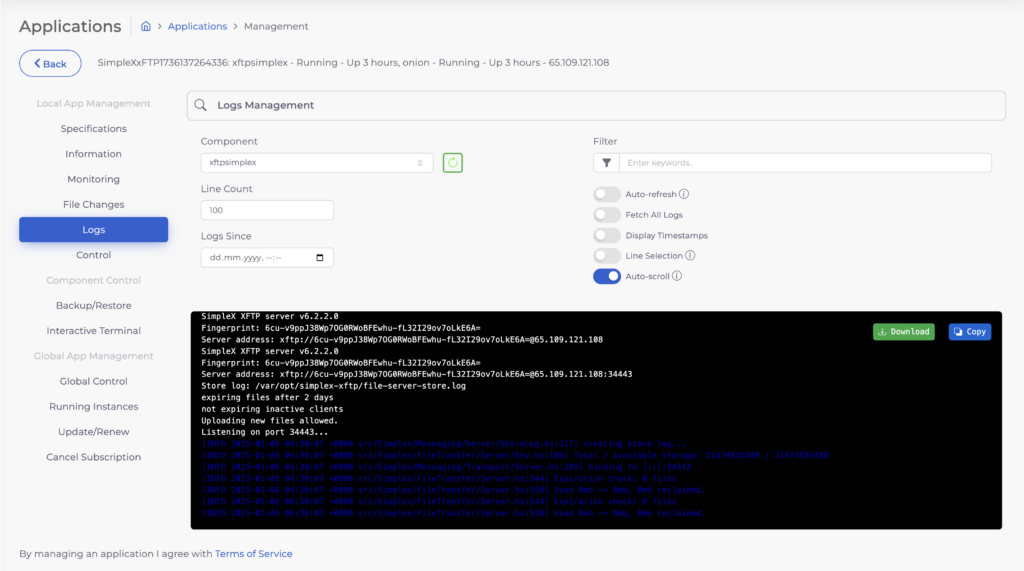
Eg: xftp://6cu-v9ppJ38Wp7OG0RWoBFEwhu-fL32I29ov7oLkE6A[email protected]:34443
Step 4: Renewing
- Server runs for 1 month by default
Go to your Management section of the application. - Update and Renew
From the inside menu, tap “Update/Renew” to begin configuring, renewing the SimpleX.
Conclusion
By following these steps, you’ll have 3 idependent powerful SimpleX SMP server running on Flux, accessible over both clearnet and Tor. This setup provides versatility, privacy, and control, whether you’re experimenting with networking or building a secure communication server. Enjoy the power and flexibility of running your SimpleX servers on Flux!
{"name":"PrivateSimpleXSMP1736137149136","compose":[{"name":"smpsimplex","description":"SimpleX SMP Server","repotag":"runonflux/simplex-smp-server:latest","ports":[5223],"domains":[""],"environmentParameters":[],"commands":[],"containerPorts":[5223],"containerData":"/etc/opt/simplex","cpu":0.9,"ram":2000,"hdd":20,"tiered":false,"secrets":"-----BEGIN PGP MESSAGE-----\n\nwV4DjzbuH3A1T/oSAQdAkjGMtRj6XzhTv59YrtSOwYpsI5iI9xA13phHYPaC\n7FwwOnQB9U4/SUt21Ru44Glekt55qpXvZ8wQz0WpowalBDtKiJjeRc+bZHgN\nILBR2K4wwV4D3a7J+BWc+fcSAQdAMPnZvLZTfmiaNSqYDGN8QepHVey4pS/S\ndbOT8rqem2ow9cq5N290Y1BG9McTnDBpnG7zoOu6HItXYuvfKzrET3aRLnwp\nwVSOx1eaKdkxqrw2wV4DGRv3m8vpsRESAQdA836gaZ4VnGXlYK/gKu1yv1Fn\n8pnbBTYSIsSQ3TpTXmMwVlmloMw1+F+qFU72Pc1XCrvFHLbgjj+NKIuo1aF/\nQgmsAAr5hGhsizoEayN+YKOKwV4DL3YqFYdf50wSAQdALECHEiYOEk0U+uoU\nKpEzLLSd/AXZLiZguM3Q+6Q792IwD9NNkiJjyWvZs2QzpmaoSpCOvYYWut0L\nQot8y9M0y7rKfY2CxevA+Iqy2OrhI8NQwV4DqbKgHAx6hnUSAQdATyNUa5/U\nPldhfP/NWLfENF3Au8canhFFkC2yrR5BmCAw/w8dC/gqQLY1yyWnNyyc+bCn\n28D7rfQrrdpOEx6u/b3pUZegnvEZBvxMWyxSTG9GwV4DJ2gx9mm/GdMSAQdA\nJMAQiMPS/3OoSJdhbJB4jrooD2G94VCYT0EtWIKJAmUwAW/6xBGsgDBCwOjF\n5vnL/gNv9NLpoIUbjlT3pDJaw2rj2FCKKw1JHJPe4qYaQLUewV4DahIwWFWO\nN/0SAQdAOl59jtotWs4yQNa7kHd+iTgiKMY7rjHb2py50bNh8W4wb0lq4ZH/\nYty0TCo/y23mlxW873V2Yb/MEzFIHkCRKfgy60qzo0CUQ5VhFsWFSNUewV4D\nAdefi3XHSFMSAQdAtI+A9mRrad3jdZz3lKdjY6HPgsgDorLekACk9gogUWUw\nM0yZ7cbbDiLxT+d6wzr8qdfnhEna7XYEW7EOvIiMlk0ty5CLV2Ptp2QF5Iiu\nJGcHwV4DH9RovDEgS3sSAQdAxcnpOBMtb1PyS1tGa9dEOywKCeTngUcoO8+e\nvGXh8TMwm3u6gpAMB8QkRr71ZAJks5yMP3Zx2SHTnp44Yh+TDdtnPd+K8ONa\nyXB+mKuhYlkzwV4DsjX1/r3gocoSAQdAdOoj1pYlfDEZMYuw4yvTbcHgLg21\nqDQEaXZbEc1sr28wuLuX+Z7kxAyCza44vPP8f6ZnHIVAPfoX8v96KBxmB0XJ\nO7fh9ownw4jiz/4l0UJf0kQBSAdihXZ9tDghbfg8E+OkVhi8tbmQUF2oTeWB\njP22V94FjhI9J9twG/CeBza+6nAtvxEqX3KlLc0bCS0Dt4V/rFDVhA==\n=DDaj\n-----END PGP MESSAGE-----\n","repoauth":""},{"name":"onion","description":"Generate permanent onion address for local SMP service","repotag":"wirewrex/hiddenonion:latest","ports":[],"domains":[],"environmentParameters":["SERVICE_HOST=smpsimplex","SERVICE_PORT=5223","ONION_PORT=5223"],"commands":[],"containerPorts":[],"containerData":"/var/lib/tor","cpu":0.1,"ram":500,"hdd":1,"tiered":false,"secrets":"","repoauth":""}],"contacts":[],"description":"Host your PRIVATE (password protected) Simplex SMP Server w/ Clearnet IP + Onion Address","expire":22000,"geolocation":[],"hash":"f0f1125faa91e9eb6ed4f1d05942e26cf6aff986ec2b66827774f8cb75481f98","height":1811324,"instances":3,"nodes":["162.55.84.8","65.109.121.108","65.108.195.35","65.108.199.10","65.108.194.9","65.109.81.5","65.109.35.91","65.109.38.84","65.109.38.75","65.109.38.74"],"owner":"164ubcHD6ERRkhg22qsSrvu7fHjdryJWUs","staticip":false,"version":7}