
- We first need to head over to https://home.runonflux.io/
- Once there, click on the desired option under “Log In” to sign in. We support ZelID, accessible through the Zelcore wallet, as well as MetaMask or any wallet that has WalletConnect support.
- Now that you have been authenticated, go to “Apps” and select “Register Flux App” from the left-hand menu.

- You will see something similar to this:

- You now need to fill in all the appliction details that you need for your deployment.
Details

- Version [Automatic]: the Flux Cloud version
- Application Name: Choose a name for your application. Note that the Flux-Domain-Manager will generate a domain based on this name. For example, if you enter “Test” the domain will be “test.app.runonflux.io.” Ensure there are no spaces or symbols in the application name. Additionally, be mindful that names may already be taken and, as a result, cannot be used by you.
- Description: Provide a description for your application.
- ZelID: Auto-populated upon login.
- Contacts [Optional]: Enter email addresses to receive notifications, such as application expiration alerts. Please use arrays (e.g., “[email protected]”). Keep in mind that contacts are publicly accessible via the Flux Cloud APIs.
- Allowed Geolocations [Optional]: If preferred, you can restrict the spawning of your application to FluxNodes located in specific geolocations, specifying continents, countries, and regions. Otherwise, the default setting will result in your application spawning randomly across the globe.
- Forbidden Geolocations [Optional]: If desired, you have the option to prevent FluxNodes in specific geolocations from spawning your application, with the ability to specify restrictions down to continents, countries, and regions. Alternatively, the default setting allows your application to spawn randomly across the globe.
- Period: Select the desired subscription duration for your application.
- Instances: Your application will be redundant running on minimum 3 to maxiumum 100 FluxNodes simultaneously. Choose the number of servers on which you want this app to be deployed (note that more instances will affect the deployment fee).
- Static IP [Optional]: Indicate whether your application strictly necessitates a static IP address. Standard deployments can be accommodated on home-based FluxNode servers, which may undergo occasional IP changes.
- Enterprise Application [Optional]: Choose this option if your application necessitates a private image, utilizes secrets, or if you want to target specific nodes for deployment. Note that geolocation targeting is not possible in this scenario.
Component
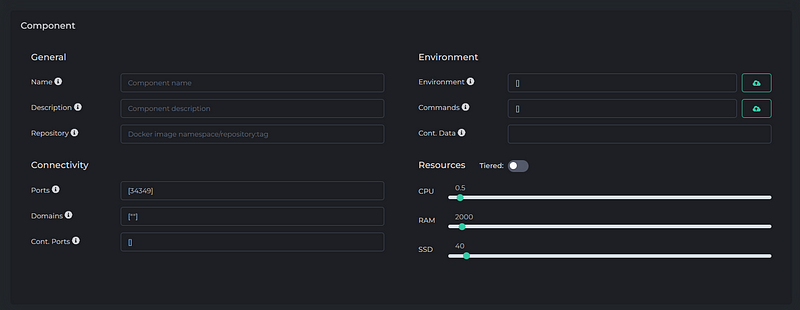
- Name: Specify the name for your Docker container. Ensure there are no spaces or symbols in the name.
- Description: Provide a description for your Docker container.
- Repository: Your Docker repository. Remember that your namespace must be whitelisted before deployment. If you require guidance on how to do this, please refer to this article. We support multiple Docker repositories, similar to Docker Hub, AWS, or GitHub packages.
- Ports: Define the Flux Cloud ports for your Docker container, noting that while we support almost all ports, there are some that are restricted. The banned ports include:
- [‘16100–16299’, ‘26100–26299’, ‘30000–30099’, 8384, 27017, 22, 23, 25, 3389, 5900, 5800, 161, 512, 513, 5901, 3388, 4444, 123]
- Domains: Add your custom domain to the deployment by placing it within brackets and enclosed in double quotations — e.g., [“www.test.com”]. If you do not wish to add any specific domain, simply use double quotations within the brackets [””].
- Container Ports: Specify the respective ports of your Docker container within brackets, for example, [80]. If your Docker container requires multiple ports, simply add commas — e.g., [80, 31000].
- Environment Parameters: You can configure environment variables for your Docker container, following the syntax of docker run -e VARIABLE=VALUE … . Place the variable=value pairs within brackets and enclose them in quotations. You can add multiple environment variables, separated by commas — Example: [“DEBUG=1”, “DB_USER_NAME=admin”, “DB_USER_PASSWORD=admin”]. If you don’t need this, leave the bracket empty as is.
- Note that commands are publicly accessible via the public Flux Cloud APIs. If you require privacy for command parameters, refer to this article to learn about Flux Storage.
- Commands: These commands aid in automating and streamlining the deployment and management of your applications in a containerized environment. Each command should be enclosed in brackets with quotations, along with a double string at the beginning — Example: [“ — logs”, “ — history”, “version”]. If you don’t need this, leave the bracket empty as is.
- Note that commands are publicly accessible via the public Flux Cloud APIs. If you require privacy for command parameters, refer to this article to learn about Flux Storage.
- Container Data: Data folder shared by the application to the App volume. Prepend with “s:” for synchronized data between instances. Example: “s:/data”.
- Resources (Do not toggle on Tiered!): Specify the resources required for your application. To pre-calculate the cost, use this link: https://cloud.runonflux.io/hello.html#cost-calculator.
- Note that this calculator excludes optional “Static IP” or “Enterprise Application” options under “Details.” Additional flat fees are associated with them: static IP incurs 3 FLUX, and for Enterprise application, it is 6 FLUX, plus an additional 2 FLUX per enterprise port.

- You have completed all the specifications. Let’s proceed to the last two final steps to successfully register your application!

- Agree to the Terms of Service by toggling the switch.
- Click “Compute Registration Message.” You will see something similar to this.

- Click on the desired option under “Sign with” to sign the registration message. We support ZelID, accessible through the Zelcore wallet, as well as MetaMask or any wallet that has WalletConnect support.

- Now you can register the application. The monthly price is 3.83 FLUX in this case. Click “Register Flux App.” Once the message is propagated across the Flux network, a “Pay with Zelcore” fingerprint will appear. Click on it to make the Flux payment. Alternatively, you can do so manually by using the go-to address, along with the memo message shown at the bottom left.

- You’re finished! Now, simply wait for your application to be spawned on an available FluxNode. For guides on managing your application and other related articles post-deployment, please visit the “Flux Cloud” category on our help.runonflux.io website.